I will admit, when I first took on the task of creating my first professional Twitter, I was a bit skeptical. I couldn’t see how this social media platform could benefit me as a preservice teacher, but can honestly say I was pleasantly surprised with the results.
Disregarding Twitter chats specifically for the moment, I can’t honestly say that Twitter is one of the most beneficial social media platforms for future and current educators. It provides opportunities to communicate with educators across the country from a variety of grade levels, who all have different experiences and opinions to share. The fact that I am able to reach out and communicate with principals, special educator teachers, administrators and experiences teachers just through the use of Twitter honestly amazes me. I felt so honored when my input was met with positive feedback from individuals who’ve spent their lives in the education system, and was excited when I learned new information about a certain curriculum, lesson idea, accommodation, etc. That said, the Twitter chat experience made these connections even better.
To begin, I will admit that I did not participate in as many Twitter chats as I would have liked, but hopefully the end of my busy semester will provide me with more opportunity to do so. I honestly loved participating in the chats that I did. For the sake of this reflection however, I will share two of my most favorite parts of my Twitter chat experience, and explain why I enjoyed these specific tweets so much.
To begin, my first ever Twitter chat provided me with a response that I was very proud of. I participated in the #ntchat, a chat for new new teacher’s, and was very proud of my response to question number 4.
This question focused on ways to support students.
I felt as if my response was very thought provoking, and even helped me figure out ways I can inspire my students. Self-assessment provides students incentive to achieve their own goals, and also builds my students’ sense of autonomy. I was also very proud of the way I articulated my response, as I feel as if I sounded very professional.
Another response that I was proud of was one forms the #tesoloz chat, a chat that deals with ESL students. I responded to a picture of another user’s response to a question regarding translators in the classroom. In this case an argument was being made about whether or not these devices should be allowed for ESL students.
This paragraph is what sparked the discussion in the #tesoloz chat.
I felt as if this response was very important because it is necessary for accommodations to be viewed as devices that allow students to have the same opportunities to succeed as their able peers, not as an advantage. It is also imperative for educators to know how to properly include these devices, such as translators, so that these devices don’t “run” the classroom, but instead assist the students who would not be able to keep up otherwise. Assistive technologies and accommodations ensure that all students have an equal opportunity to learn.
All in all, I am very thankful to experience Twitter at a professional level, and to be able to partake in Twitter chats and communicate and learn from educators around the globe. Although skeptical, I am incredibly happy to have established this professional learning network and would recommend Twitter and Twitter chats for all educators, old and new.
Collaboration and assessment tools are incredibly important in order to maintain a classroom that relies on each student’s input, while also being able to assess their skills and understanding simultaneously. These tools can be found online, and many of them are free to design and create tools customized to each individual classroom. Of the immense amount that can be found, I decided to choose three to be reviewed and rated on the Triple E Evaluation rubric. These three finalists were Poll Everywhere, Edmodo, and Twiddla.
I began with Poll Everywhere, which was pretty straightforward and easy to use. This tool can be used quite simply to poll students, and ultimately check for understanding or make anonymous class decisions. I created a quick, one question poll to get a sense of how this website works, and really got a sense of how easy this tool was to use. In this case, I created a poll to check my student’s understanding.
Once students respond, their responses will anonymously appear next to each selection.
Although Poll Everywhere is a good tool to formatively assess and check my students’ understanding, it is only useful for collaboration purposes if a class decision is to be made. That said, on the Triple E Evaluation rubric, this tool scored a 15 out of 18, losing points in the category titled “Extending the learning goals”. I gave Poll Everywhere lower scores in this area because it doesn’t do a great job of building onto other aspects of learning, nor does it give students much of an opportunity to extend themselves outside of the classroom. This tool is one that is mostly used by the instructor, and therefore limits the creative expression of my students to a simple selected answer choice. That said, I believe this tool can be affective when it is used to check for understanding or make a class decision, and not much else.
The second tool that I toyed around with was Edmodo. Having heard of this tool before, I was interested to see what it was really all about. Ultimately, Edmodo resembles an educational Facebook. Set up very similar, this tool allows teachers to create a page devoted to their class and post assignments, quizzes, polls, and general announcements for the class to view and respond to. This tool enhances student/teacher communication, and provides the teacher with the opportunity to easily assess and collaborate with his/her students. I created a mock Edmodo page to better experience this tool, and was able to get a good sense of the options available.
Edmodo’s home screen closely resembles Facebook’s home screen.
On the Triple E Evaluation rubric, Edmodo scored an easy 18/18. This tool is incredibly beneficial for collaboration and assessment in all aspects. It enhances teacher/student communication immensely, and provides a multitude of possibilities. Unlike Poll Everywhere, Edmodo can be used by students at anytime, and allows them access to class information whenever needed. That said, I will most definitely be utilizing this tool in my classroom to assess, poll and effectively inform my all of my future students.
The final tool I evaluated was Twiddla, which can most basically be described as an online whiteboard. Accessible to all my students, this tool allows my class to share ideas on one collaborative space, which appears as a blank whiteboard. Students can draw, type and insert tables and images onto a screen that the entire class shares, allowing for direct collaboration and gives the teacher the ability to monitor the entire assignment. That said, this tool can properly asses my students in that I will be able to watch them work in real time, providing insight on which students understand the material and which students still need help.
All students are able to view the same screen.
After a close review of this tool, I decided to score Twiddla a 17/18 on the Triple E Evaluation rubric. Although I believe that this tool can be an incredibly effective one for collaboration and assessment, I do believe it’s multitude of features and options could cause some students to get off task or become distracted. That said, the only point that was lost was in that category. Regardless, I do believe those tool provided many avenues for learning and allowed for the most creative expression than any of the previous tools, and could see myself using Twiddla in my future classroom.
All in all, each one of these tools can be of use to me with my future students. Although Edmodo is my favorite, I do believe that each tool could be helpful for me to assess and promote collaborative work in my future classroom, and I cannot wait to implement these tools into my own lesson plans.
In today’s classrooms, the idea of inclusion is anything but a new concept. Nowadays, children of all backgrounds, cultures and abilities can be found in the general education system. Classrooms are a melting pot, providing a multitude of opportunities for students to learn from one another, and a multitude of challenges for teachers as well. Although each and every individual student’s differences are to be welcomed, there are often instances in which these differences can limit their abilities in the classroom. It is in these cases that certain devices and programs might be required to level the playing field, and ensure that every student is given an equal opportunity to learn. The student should not struggle to adhere to the structure of the class, the class must become accessible to the student. Whether through personal devices or programs implemented by the teacher, accessibility tools are often vital for allowing students to reach their full potential. To extend my knowledge as an aspiring educator, I decided to research three tools that can help make my classroom more accessible for my future students and their potential needs.
I began my search by researching tools that can help my individual students with any and all specific disabilities they may have. Often times, these individual tools can provide my students with a sense of autonomy, and control over their disability so that they may function as well as their able peers. The first tool I discovered is actually a setting provided by Windows 10, Magnifier, in which students with visual impairments can better view their screen and stay on task with the rest of the class during online assignments. This application is preinstalled on most personal Windows 10 computers, and appears as a magnifying glass icon in the settings menu. Once activated, the user may guide the mouse over anything on the screen, magnifying the content to their desired percentage. For visually impaired students and individuals, this application can make staying on task and browsing the web much easier and much less frustrating.
I was able to use the “View” setting to magnify items with my mouse.
I was pleasantly surprised to find that this application was already preinstalled on my own Windows laptop. It was very easy to find and use, and I was able to magnify the entire screen, or just the areas in which I moved my mouse. I also was still able to click and use my computer as normal while simultaneously magnifying my screen. For my future students with visual impairments, this tool can be very easily incorporated into my room in that, it does not need to be installed or purchased beforehand.
When measuring this tool’s effectiveness on the Triple E Evaluation scale, I would easily rate this an 18/18. In no instance do I find this tool as anything but effective and easily used, and it provides my students with the ability to limit their visual impairment on any Windows computer, inside and outside of the classroom. In fact, the only issue that I found with this tool is one that lacks a category on the Triple E rubric. If possible, this tool would lose points for only being compatible on Windows computers. That said, if a school uses only Apple computers, than this specific tool would not be accessible or preloaded on their devices.
The second tool I evaluated was one that is used to assist my students who may have more severe disabilities. Nonverbal students often have plenty of insight to share and want to participate and interact with their verbal peers. In this instance, an augmentative and alternative communication device is required, so that a nonverbal student may be given the gift of communication. These devices come in many forms, and for the sake of this post I have decided to choose one that I found to be most beneficial and accessible for teachers. Proloquo2Go is an AAC device in the form of an application that can be installed and run on an iPad, or similar touchscreen tablet or device. For students with touchscreen cell phones, this application can be installed to provide them with an AAC device that literally fits into their pocket. With a variety of settings, Proloquo2Go can provide students with pictures to select their desired needs, or a keyboard to type sentences that may be translated to speech.
Proloquo2Go is accessible for nearly all ages.
Although weighing in at approximately $250, Proloquo2Go still falls on the cheaper side of the market for AAC devices, and can be installed on whichever device one chooses. More benefits stem from the fact that this device is ultimately an application, meaning that updates may be easily installed as developed, ensuring that students have the access to the newest version of this technology.
When deciding where this device falls on the Triple E Evaluation scale, I believe Proloquo2Go would also receive an 18/18. In my opinion, the gift of communication is priceless, and this specific tool is one of the best of the currently available AAC devices. For my future students, communication barriers may be crossed through the use of Proloquo2Go, and my students will be able to share their thoughts, feelings and insights in ways they never could before. Every student’s voice counts, and Proloquo2Go provides that voice for nonverbal students.
The final tool I discovered was one that could benefit myself in terms of the creation of my own content. In my classroom, I want to ensure that my instruction and the material that I use is always accessible to every one of my students. To accomplish this, I can use a web accessibility tool called WAVE . Quite simply, to utilize this instrument one must copy the link of a website or article into the online tool, and a report of the link’s accessibility is subsequently created.
WAVE is incredibly easy to utilize.
As demonstrated above, WAVE’s website is incredibly simple looking, and very straightforward for teachers who want to ensure that their websites and resources are accessible for all of their students. WAVE will quickly identify any errors, alerts, features, structural elements, or contrast errors that may make the resource difficult for students with a variety of impairments to use. In the future, I feel as if this tool is simple enough for me to use nearly every time I assign or use any type of online resource.
On the Triple E Evaluation rubric, however, WAVE falls a bit lower than the previous two accessibility tools. I ultimately gave this tool a 12/18, as it loses a generous amount of points in the category that focuses on the student’s engagement and how it is advanced by this tool. Being that it is oriented mostly towards educators, and that it merely checks an online resource contrary to changing or enhancing it, I believe that WAVE inadequately seeks to engage students. Besides this, I do believe that this tool can be beneficial in some ways, but not nearly as much as the prior devices listed.
Overall, I believe this search was incredibly helpful and has provided me with an abundance of tools that I can use in my future classroom. From students who are visually impaired, to those who are nonverbal, and everything in between, these accessibility tools can provide all of my students with an equal opportunity to learn. In my case especially, due to the fact that I would prefer to teach special education, I must gather information on as many resources and devices as possible to be used with my students. Education is vital, and every child must have the opportunity to succeed and be the best versions of themselves possible.
Recently, the concept of gamification and the incorporation of coding and robotics have been very prevalent in today’s classrooms to encourage student engagement. Not only do students enjoy these games, but they provide interactive opportunities for students to learn, practice and master the content. That said, I decided to browse the internet in search of the best coding, robotics, and gamification tools that I could incorporate into my future classroom. I toyed around and created a mock artifacts with each of these tools to get a good sense of their accessibility, convenience, and effectiveness in the classroom. I also scored each tool using the Triple E Evaluation rubric after thoroughly assessing each item.
The first tool that I came across was Kahoot, which is a fun, colorful program that allows teachers to create their own quizzes. These quizzes are designed to be a competition amongst students, where the student with the quickest responses and most answers correct wins, providing an incentive for students to know the content and try their hardest. To use this tool, an interactive and/or SMART board is required, and a device with access to the internet is required for each student, whether it be a cell phone, laptop, iPad, etc. Its quick and easy to create one, from a teacher’s perspective, and very easy to log in and connect to the Kahoot, from a student’s perspective. As an example, I decided to create an account and construct my own mock Kahoot to fully experience the tool.
Students will select an answer on their individual device.
As depicted, the Kahoot is colorful, competitive and can be created and customized for nearly every lesson. In this case, I created my Kahoot to check for understanding about a book my class could be reading, such as the Hunger Games. Students would respond to each question, and their placements would be shown and ranked at the end. That said, another fun feature about Kahoot is that students can create their own usernames when playing. This can allows kids to answer anonymously and would allow students who may be struggling to avoid any embarrassment.
In the end, I thoroughly enjoyed using Kahoot and feel it could be an incredibly effective gamification tool to use in my future classroom. If I were to rank this on the Tripe E Evaluation scale, Kahoot would earn and honest score of 17/18. Due to its ease, accessibility, room for adaptation, and endless possibilities, Kahoot is by far one of the best completive quiz tools I have yet to toy around with. The only area where Kahoot lost a point would be in the category that refers to the tool’s availability to stay on task. For, when Kahoot begins to get very competitive, students may become distracted and a bit less focused on the content at hand.
With the success I found after evaluating and creating my own Kahoot, I decided to select a similar gamification tool and compare and contrast each platform to decided which is most effective. That said, I found Quizizz, a gamification tool that is about as easy to create as a Kahoot, but has different options as to how students will select responses. Quizizz prides itself on being a student-paced formative assessment that is fun and engaging for students at any level. Much like Kahoot, these quizzes are entirely customizable and the platform itself is colorful and fun. For my artifact, I decided to create a Quizizz similar to my Kahoot in order to get a better sense of the tools’ similarities and differences.
The question on the left serves as an example for what my students will view on their devices.
As first glance, the set up is visually different than Kahoot’s, and this tool allows teachers to get a sense of what their students will view on their tablets as well. That said, not much is different between the two when referencing the quiz’s set up, however there are differences regarding how the students use these tools. Whereas Kahoot is a competitive game, Quizizz is more designed for students to respond to the pre made quiz at their own pace, and allow for a more accurate measure of each student’s understanding of the content. For this matter, Quizizz serves as a more accurate reading of student understanding, but does not promote student engagement as much as a competitive Kahoot would.
All in all, Quizizz is a great tool to monitor each individual student’s progress in the form of an online, formative assessment. On the Tripe E Evauation scale, I decided to give Quizizz a whooping 17/18 as well. However, in this case, points were lost in the category that notes student motivation. Although a colorful and personalized quiz, this tool is much like a typical pen and paper formative assessment, and therefore lacks the ability to motivate students the way a competitive game may.
The final tool I decided to explore was a robot, Ozobot, which requires a basic knowledge and understanding of coding to operate the device. I selected this tool because I was given the opportunity to experiment with it in my own college classroom. Although a bit pricey, Ozobot is a tool that can easily introduce the concept of coding to students who have little to no experience with the subject, and can be adapted to lessons within the curriculum as well. In order to provide a basic understand of what Ozobot really is, I’ve attached an introduction video about the robot and its basic functions.
The video above does an excellent job at depicting Ozobot’s many uses and its adaptability in classrooms of all ages and levels. It provides students with a basic understanding of coding and could be incorporated into a variety of lessons. For example, worksheets could be designed to require certain colors as responses that can create a track for Ozobot to follow. This could promote student engagement because their incentive to complete the assignment would be the ultimate creation of a track for their Ozobot. Students will master the content at hand while also mastering the concept of coding that can be applied to future technological encounters.
When referring to the Triple E Evaluation rubric, Ozobot would score a 16/18, losing points in the “Time on Task” category. For, being that this robot has many different speed and trick options, students can become easily distracted and off task when attempting to complete an assigned task. When experimenting with this tool first hand, I found it difficult to keep from experimenting with the Ozobot myself, let alone if I was a curious, young learner. The Ozobot would also lose points in the accessibility category, if there was one, as each robot is about $50-$60 and could only be used during centers or stations, unless you are willing to spend a pretty penny.
In conclusion, I thoroughly enjoyed my search for effective gamification tools and robots that could be used in my future classroom. My personal favorite after this reflection would have to be Kahoot, simply due to its easy set-up, customization and competitive element. After just experimenting with it for a few minutes I felt as if I was just playing a game, and not at all like I was mastering the content as well. I feel as if this tool would be the most effective when keeping students engaged, and simply makes learning fun. That said, I also enjoyed how Quizizz can accurately assess my students’ current level of understanding, as I can use these results to decide what I must focus on instruction wise. I did also like Ozobot, and feel it would be my favorite option if it was just a bit cheaper and easier to set-up and/or maintain. Regardless, I feel that all of these tools could be incredibly helpful for me in the future, and could serve as fun and interactive ways to promote student learning and overall success.
As an aspiring educator, I am continually searching for new tools and technologies that can be incorporated into my future classroom. For the purpose of this reflection, I’ve selected three different content creation tools to toy with and review. Of the three tools selected, each tool falls under a different category. From the presentation category, I selected Animoto; from the infographics category, I selected Infogram; and from the storytelling category, I selected Sutori. I also further assessed each of these tools by rating them on the Triple E Evaluation scale, and I will further discuss this as I reflect on each individual tool.
I began with Animoto, which is a tool for creating brief, video presentations. It was relatively easy to make an account and navigate the site, and therefore can be used by students as well as teachers. The video presentations that can be made are very visually appealing and have a multitude of customization options, however, these options are quite limited unless you a willing to pay for a subscription. That said, I attempted to create my own artifact using only the free options, to get an idea of how I can use this tool in my classroom without breaking the bank. Due to its easy to follow nature, I decided to create an artifact that could be created by one of my future students. With assistance where needed, I believe this tool can be used by 3rd/4th graders, and created a mock assignment through Animoto as an example. In this video, my future student (me) was instructed to create a video presentation that used sequencing to order the events in the fable “The Tortoise and the Hare”. Below is a screenshot of the screen students will see when creating their Animoto.
A screenshot depicting the “slides” of my mock video presentation.
It was quite simple to construct the video, and provided me with plenty of options to customize it however I’d like. That said, I was only able to make the video a maximum of thirty seconds long, and could only fit one short sentence of each “slide”. This limits the potential projects that Animoto could be used for, however, a short sequencing project seemed to work just fine. Besides these deficits, the video created was very visually appealing and professional looking nonetheless.
I selected a “Woodlands” themed Animoto to match the environment described in the fable.
After creating this video and spending ample time on Animoto’s website, I decided that I would score it a 12/18, meaning it has average learning potential and its effectiveness depends on the instruction around it. Animoto’s score is mainly hindered by the limits that the free version puts on a project’s potential, as not much information can be fit in a thirty second video. Animoto’s material restriction keeps students from depicting any in depth understanding, and the concept of scaffolding (as a teacher) cannot be done due to this limit as well. That said, I wouldn’t recommend Animoto for use by teachers in a lesson plan, unless they are willing to spend money, and should only be used by students who do not need space or time in the video to be incredibly descriptive.
The next tool I evaluated was an infographic, Infogram to be exact. This tool allows users to create visual reports and graphs to be used for a multitude of lessons and assignments. Contrary to Animoto, the free version of Infogram still provides the user with a multitude of customization options and ways to present information. That said, this website was a bit more confusing that Animoto, and therefore may only be used my older students or those more experienced with classroom technology. While creating my artifact using this tool, I decided to stick with “The Tortoise and the Hare” lesson theme, but instead made an infographic that could be constructed as a class. That is, an Infogram that I could create while my students brainstorm ideas to add during a group discussion. In this case, I created an Infogram that compared the Tortoise and the Hare by listing their character traits.
In a class discussion, I would have more empty “bubbles” for student’s to brainstorm character traits.
My Infogram was very visually appealing and served its purpose as an easy character trait organizer, and the process wasn’t very time consuming. Although I wasn’t a fan of its sometimes confusing nature, I do believe it is worth it for Infogram’s endless customization opportunities. It allows the user to be creative with their assignment, or in this case their lesson. Below I attached a screenshot of the customization screen where the Infogram is constructed.
Many of the options have detailed settings that can be confusing to young students.
The Infogram was a tool that I thoroughly enjoyed creating, as it is one that provides a multitude of learning opportunities. It is for that reason, that I decided to rate Infogram a 15/18 on the Triple E Evaluation scale. Although confusing for younger students, Infogram has endless potential in creating anything an older student or teacher may need for an assignment or lesson plan. It has plenty of opportunities for effective learning due to its limitless design possibilities. For Infogram, points were deducted due to its semi-confusing nature, however, I would still recommend this tool as an effective one for use by students, teachers and administrators alike.
The last tool that I used was Sutori, which is a story-like presentation creator. I created a free account, and immediately noticed how much simpler this tool was compared to Infogram. It was very straight forward and made it easy for me to create new pieces of the story, insert multimedia and change the sequence if necessary. I again decided to stick to “The Tortoise and the Hare” theme and switched back into a students mindset, creating a Sutori that simply described the plot of the fable. It was very easy, took me a whopping ten minutes to complete, and therefore can be very useful for younger students. After I completed my artifact and selected the “present” button, I noticed that my completed Sutori very much resembled basic presentations, and that the only difference is the process by which they are constructed.
My finished Sutori very much resembled a typical presentation.
I was unpleasantly surprised by this, as I expected it to be a bit more unique and visually attractive. There were more customization options that could have been used to make the slides more appealing, however they wouldn’t change the overall bland power point format. Attached is the way my Sutori looked during the construction process, as it resembled a story-like timeline. Regardless, construction was easy and easily understandable for less experienced users.
My Sutori looked much different while I was constructing it.
Overall, Sutori is a good tool for use by students and teachers, but can be easily replaced by other basic presentation tools. Due to its lack of exceptionality, Sutori scored an average 11/18, as I rated it only a bit higher than a basic presentation. It has the potential to be an effective learning tool if advanced instruction is given to enhance the content of the Sutori, however the same could be done with another tool. Sutori’s only unique feature is its timeline like design, but can be useful for young, inexperienced technology users. For these reasons, Sutori is an adequate tool that I would recommend for students of all ages, and teachers in need of an easily constructed presentation.
All in all, I feel as if my search to find effective content tools was rather successful. All of the tools that I tested out could definitely be of use to me in my future classroom, whether it be for a lesson plan, or as an assignment for my students. My favorite content tool was easily Infogram, simply due to its ability to support my students’ creativity. Regardless, I am excited to see how these tools can be of use to me in my future classroom, and can’t wait to discover the new technologies that will continue to develop.
Prior to my search, the word TPACK was just a combination of letters that meant nothing to me. I hadn’t the slightest inkling at what it meant besides the assumption that the T stood for technology, as it was a term I first heard in my “Technology in the Curriculum” course. My hypothesis wasn’t very far off. However, I soon discovered that TPACK’s sole purpose isn’t just the use of technology in the classroom, but is how technology must be combined with a generous amount of content and pedagogical knowledge as well. First, I must give credit where credit is due, and therefore would like to attach the video that best described TPACK to a beginner like myself.
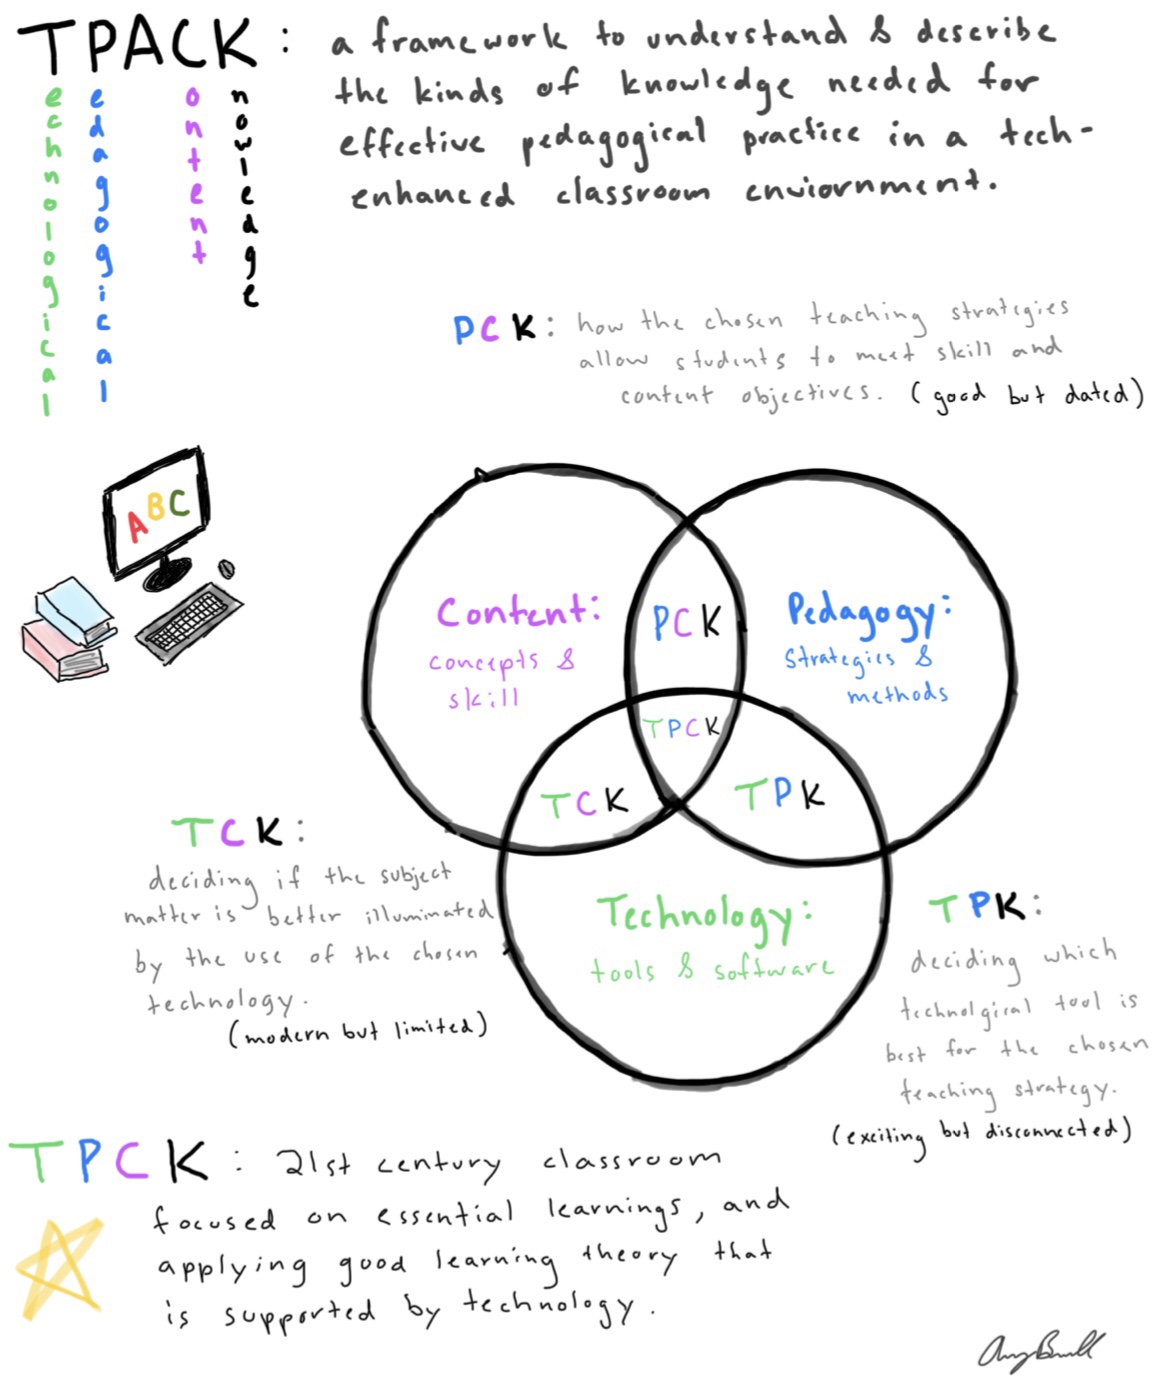
That said, tpack.org defines TPACK as an acronym that stands for technological pedagogical and content knowledge, and is a framework that aims to optimize students’ learning experience and teacher effectiveness in a 21st century classroom. It focuses on a teacher’s ability to know what needs to be taught (content), how it needs to be taught (pedagogy), and which device must be used (technology). To thoroughly understand TPACK, I decided to use the information collected from my sources to create a visual that housed some of my most important findings. This visual was a sketchnote, and was my first experience creating one as well.
My sketchnote is an easy, visual source for information!
I’d like to first note that I loved every moment of creating my sketchnote, and think this is the best method for my note taking in the future, and is also a technique that I can use with my future students. I was able to combine visuals, definitions, diagrams and color coordination in a note page that is easy to follow and can be shared with anyone.
I organized my sketchnote in a strategic manner in order to make it easy to read and understand the TPACK method. I began by color coding the most important terms of the TPACK method, that is technology, pedagogy, and content. I then introduced TPACK and how it is the framework needed for a teacher to correctly integrate technology, effective teaching skills, and overall knowledge of the curriculum to create the most advanced learning environment possible. I subsequently created a Venn diagram of the three main components that was inspired by another one that I found on the Oakland Schools Literacy website. This helped me immensely because it visually depicted how just pedagogical content knowledge, or just technological content knowledge isn’t enough, and how the incorporation of all three is crucial for the 21st century classroom.
In the future, I plan to do my absolute best to adhere to the TPACK framework, as I believe it can provide limitless opportunities for my students. Especially in a special education classroom, technology is vital for helping students achieve, and simply improving their daily life. For example, the incorporation of AAC technology can give a nonverbal student the ability to speak and communicate with others. I must feed off of my students’ abilities, and select the appropriate tech to be used at the appropriate time, whether it be laptops, a SMART board activity, or the use of push button “switches” in a low functioning classroom. This technology, with the incorporation of my pedagogical knowledge, and knowledge of the content can provide my students the best possible environment and opportunities for learning.
After researching more about TPACK and creating my sketchnote, I can definitely say that my knowledge on this framework has grown immensely. I went from being completely unaware of what the acronym stood for, to being able to describe how each element of the framework must be incorporated into the classroom. That being said, I believe this experience has also provided me with a newfound love for sketchnotes and their effectiveness. This method of note taking helps combine visuals and definitions, and allows room for creativity. I believe that sketchnotes will most definitely be incorporated into my future classroom, as it will allow my students the freedom of creating their own little masterpieces while also memorizing and learning the necessary content.
This past week, I created my first professional Twitter account (@averyjbramell), and took part in the RoCo PLN Twitter Challenge in order build onto and create my very own professional learning network. At first, I was a bit hesitant about this challenge, and most of my hesitance stemmed from the fact that I was nervous to interact with other presevice and established teachers on Twitter. I wanted to extend my knowledge to others on Twitter without using any incorrect terminology, or mistaking any pedagogical concepts, as I wanted to be taken seriously and impress the teachers that I interacted with. That said, I took a leap of faith and began the challenge on Monday, completing the first requirement by tweeting about a concept that I had recently learned.
Monday’s Tweets:
As pictured, Dr. Sam Fecich (@SFecich) quickly replied to my tweet and requested more information about the new and novel curriculum I discussed, which gave me the opportunity to extend on the concept. I was very excited about this tweet because I felt as if I gave an impressive amount of information on a concept that another educator was new to, and it made me feel as if the knowledge I passed on could benefit an established educator. The small success from my first tweet gave me a lot of confidence moving forward, as I began to look forward to tweeting and interacting with others in my professional learning network, and that my thoughts and ideas were welcomed and even desired by other educators and preservice teachers.
The second day of the challenge involved the tweeting of a question that I had for any experienced teachers on my professional learning network. I struggled with day two, because I wanted to ask a question that focused on my primary interest of special education, that sounded professional, and that required a decent amount of thought.
Tuesday’s Tweet:
My question was followed by a response from my professor, Amanda Davis (@MandiedavisAD), that very much helped me better understand how important a teacher’s role is in the classroom. If a tone is set that all student’s must respect each other and everyone’s differences, than a student with ASD should not be badgered by his classmates due to his need for additional support.
The third day of the challenge was easily my favorite day, but only until after I completed it. Let me specify. I was initially the most nervous for this task because it required me to join a live twitter chat and communicate with others in real time, asking and answering a multitude of questions in an hour. I decided to join #ntchat, a Twitter chat designed for new teachers. It consisted of five questions between eight and nine o’clock that would be answered and discussed by all of the users involved. A former principal from California, Lisa Dabbs (@teachwithsoul), asked the questions, and the highlight of my chat was when another educator agreed with and supported my response to question three.
Wednesday’s Tweet:
I was super excited when Cassie Reeder (@cassiereederedu) responded to my answer in such a positive manner. After browsing her profile and following her, I could tell that Cassie was an established educator with her own podcast, the “Connected Educator Podcast”, and her opinion was very important to me. I was honored that someone like her had confirmed that my response was meaningful and important, and for that reason, this day of the challenge was my favorite.
Day four involved the tweeting of an article that I found to be important and worthy of sharing to my professional learning network. I decided to search on Education Week for one, because I wanted to ensure that my post would be from a reliable and well known source in the field of education. I also decided to choose an article that involved special education, and subsequently tweeted the most interesting one that I came across.
I enjoyed Thursday’s challenge because it gave me the freedom to choose an article of interest to me, and gave me the opportunity to browse a multitude of interesting articles that dealt with the world of education. That said, it was this challenge that felt the least rewarding, as my article did not generate an immense amount of conversation, and I directly interacted with less individuals than I had the day before.
The final day of the RoCo PLN challenge required a tweet that included five users and accounts that I felt were great resources for other educators on my professional learning network. This tweet was beneficial in that it required me to reflect on my experiences during the challenge to determine which users were my favorite and the most helpful for me.
Overall, this challenge was incredibly fun and beneficial in that it helped me create and establish my professional learning network through Twitter, and set me up with great educators and fellow preservice teachers that I can now share ideas with and continue to learn from. I was also completely unaware of Twitter chats until this challenge and now have the ability to communicate with educators across the country in real time. Ultimately, I am incredibly thankful for the opportunity to participate in this challenge and for all that I have learned from it, and cannot wait to see who I connect with and what more I will learn moving forward.
Upon selecting a platform on which to create my first professional blog, I decided I would need to find one that was very simple and easy to navigate, as I am still a beginner. After scanning through EduBlogs and Blogger, I was not impressed with the features they had to offer. I found them to be a little confusing for beginners, and am very picky about the appearance of the platforms. I disliked Edublogs‘ font and overall design, and was not a fan of the color scheme used by Blogger. I felt relieved when I finally scanned through WordPress and realized that it was exactly what I was looking for. My blog was very easy to create, and I loved the simple and professional design of this platform. WordPress also provides an abundance of customization options to ensure that my blog can be a complete reflection of myself, my style and my thoughts. Overall, I believe this was the best option for me, and I am very much looking forward to what becomes of my blog on this platform.